· One min read

To go live, FastStore projects developed with Gatsby 4 and Next.js require a new environment variable. This new setting relates to improving and automating the hosting flow in WebOps.

What has changed?​

Setting up the SITE_HOST environment variable is now necessary in order to deploy new FastStore websites, developed with Gatsby 4 and Next.js, to production.

Why did we make these changes?​

To improve the hosting flow in WebOps, the WebOps team built a new automation related to this new environment variable.

What needs to be done?​

Open the vtex.env file and add the SITE_HOST key with the main domain specified in VTEX Account Management as the value. For more information, please refer to Configuring external DNS for a custom domain.

vtex.env
+ SITE_HOST= {hostDomain}

· 4 min read

PLPs now support price range filtering, and nonexistent PDPs can now handle 404 errors. Also, more components have been updated to conform to the new Base Store Theming architecture.

· 4 min read

The FastStore UI now includes the Hero and Dropdown components. Also, the FastStore API was enhanced to better support page error handling. Global changes were also implemented to enable price range filtering on PLPs.

· 4 min read

New cart-related events are now being tracked, and enhancements in the LCP score have been implemented. Also, more components have been updated to use the Base Store theming structure.

· 3 min read

New OutOfStock and ProductCard components added to the FastStore UI. Also, improvements in the FastStore API now allow fetching additional properties of a product.

· 2 min read

Users will now need to authenticate to VTEX in order to access WebOps previews generated for pushed commits in a FastStore repository.

To access the deploy previews, users will need to have access to the myvtex.com domain of the VTEX account indicated either in the GATSBY_STORE_ID from the vtex.env file or the api.storeId entry exported by the store.config.js file.

What has changed?​

Previously, WebOps previews were published to public URLs by default. Now, they require VTEX authentication and are private by default.

Why did we make these changes?​

Deploy previews may include changes to your storefront and new features that are not yet available to the general public. They may also trigger false phishing alerts since they are the same website hosted on a development domain. This change aims to prevent unauthorized access to such content while making the platform more secure.

What needs to be done?​

Every new deploy preview will be private by default. However, to be able to log in and access the private previews, you must install the vtex.faststore-auth app in your account. To do this, run the following command:

vtex install vtex.faststore-auth

If, for any reason, you need your FastStore previews to be accessed by the public or third-party solutions, you may disable authentication by adding USE_DEPLOY_PREVIEW_AUTH=false to your project's vtex.env file.

· One min read

We've recently changed the configurations needed for the secure subdomain. Hence, if you come across the "This connection is not private" error while trying to complete an order at your store website, check if your website's secure subdomain is pointing to secure.{hostname}.cdn.vtex.com, where {hostname} is the complete address of your store.

What has changed?​

The secure subdomain must now point to secure.{hostname}.cdn.vtex.com, where {hostname} is the complete address of your store. Before, the secure subdomain was being pointed to {account}.vtexcommercestable.com.br.

What needs to be done?​

If you come across the "This connection is not private" error in your store website, repeat the Hosting a FastStore + VTEX website guide, making sure that the secure subdomain is pointing to secure.{hostname}.cdn.vtex.com.

· One min read

We’ve recently launched VTEX Headless CMS 1.x. For this new version to properly work, the Releases app must be installed and configured on the VTEX account.

What has changed?​

Besides notable new features, such as the non-blocking Publishing Flow, this update makes the VTEX Headless CMS strictly dependent on the Releases app.

Why did we make these changes?​

Gradually, Releases should become the single place in the VTEX platform to look into any changes that might affect published stores. VTEX Headless CMS moves in sync with this roadmap by requiring Releases integration in its latest version. This both reduces the complexity of our Publishing Flow implementation, facilitating debugging and improving stability, and also makes sure we’re future-ready with how the VTEX platform is moving.

What needs to be done?​

Developers must upgrade to VTEX Headless CMS 1.x and configure the Releases app as described in this guide.

· 2 min read

WebOps now supports Incremental Static Build (ISB), a hybrid server-side and client-side rendering solution. With ISB, only part of the pages are generated during the website build. The others are generated as shoppers start visiting them.

In practice, the first user to load a page triggers its generation. And, once the first load completes, the final page is cached. Then, all subsequent visitors receive the cached version of that page immediately and experience an optimized page loading time.

info

This feature is strongly recommended for stores with thousands of SKUs since generating all SKU pages during the website build may be very time-consuming.

What has changed?​

To improve the loading time of SKU pages, you can now activate Incremental Static Build for your FastStore project. Part of the store's pages will be generated in each build, but the SKU pages will follow the Incremental Static Build behavior described above.

caution

Keep in mind that:

  • A deploy resets the caching status of all pages, meaning that pages previously generated must be requested again in order to be re-generated.
  • Once a page is generated, it will not be re-generated by external content changes. For example, if you edit a given product's description in the VTEX platform, you must redeploy your website to generate the page with the updated description.

What needs to be done?​

In order to activate this capability, follow these steps, according to the framework used in your project.

Gatsby​

  1. Open your FastStore project and update all pages requesting server data to use the following cache-control headers:
return {
status: 200,
props: data ?? {},
headers: {
'cache-control': 's-maxage=31536000, stale-while-revalidate',
},
}
  1. Set the following variable to true on your vtex.env file:
vtex.env
USE_STALE_CACHE=true

Next.js​

  1. Open your FastStore project and update all pages requesting server data to use the getStaticProps and getStaticPaths APIs.
  2. Set the following variable to true on your vtex.env file:
vtex.env
USE_STALE_CACHE=true

· One min read

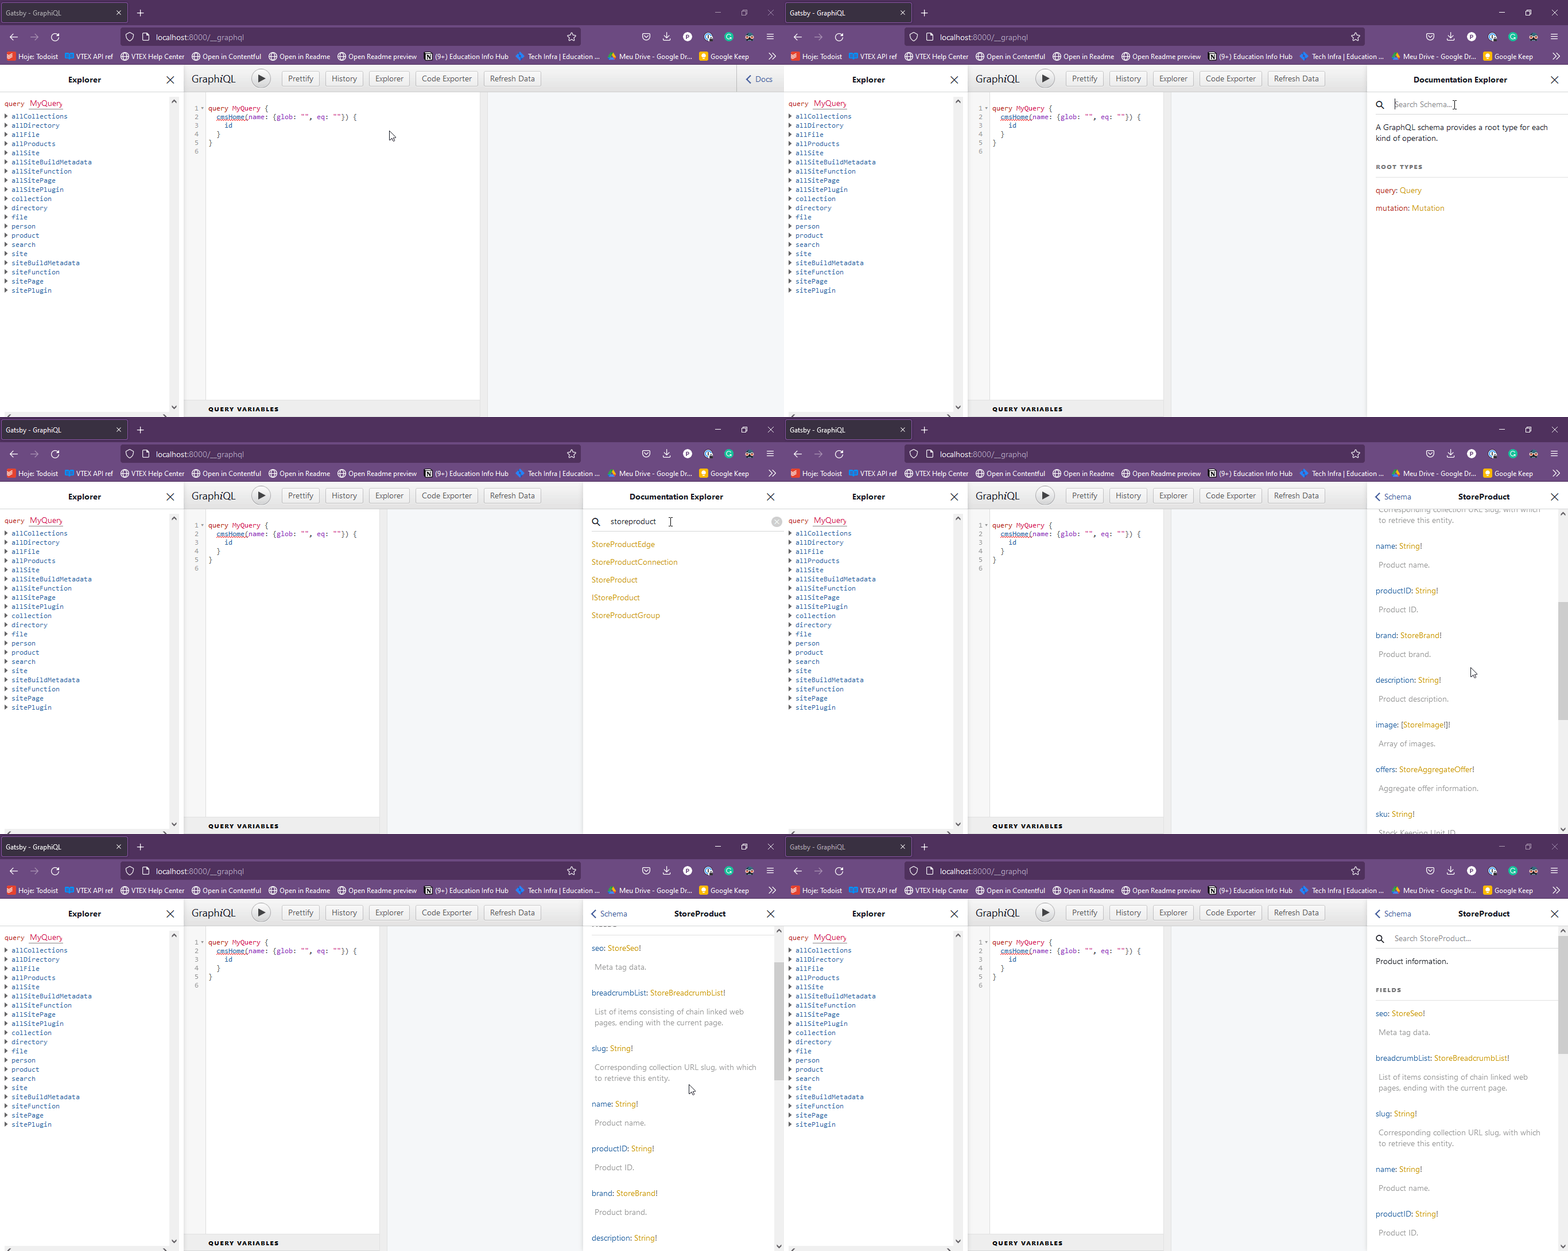
FastStore API reference documentation is now available. You can check it now via the GraphiQL IDE.

What has changed?​

While working on your FastStore website, you can run your project locally and use GraphiQL to explore the API. Now, when you do this you will see that each type, argument, query and mutation has an associated description.

What needs to be done?​

To explore the FastStore API reference documentation, follow these steps:

  1. Run yarn in your project to reinstall the @faststore/api dependency.
  2. Run yarn develop to start a local server.
  3. Access GraphiQL by going to this address:
http://localhost:8000/__graphql
  1. Click on the Docs button on the upper right corner.
  2. On the docs tab you can browse through the definitions or search for types by name.

Screen capture of the procedure described above.